Ableton Live
DarkStage follows Ableton Live's transport and counter through a Remote Script that reads Live directly — no MIDI port, no Max for Live.
Before you begin: install and launch DarkStage, open DAW Sync, choose Ableton Live, confirm DAW Sync is running, and leave DarkStage open while you configure Live. See DAW Setup.
Ableton Live setup
Ableton connects through a DarkStage Remote Script that reads Live directly — no Max for Live, no Mackie Control and no MIDI port.
1. Install the DarkStage integration
Install the DarkStage Ableton Integration from DarkStage's DAW Sync settings.
2. Restart Ableton Live
Quit Ableton Live completely, then start it again — Live looks for the integration only while it's starting.
3. Open Live's MIDI settings
In Live, open Settings ▸ Link, Tempo & MIDI.
4. Choose the DarkStage control surface
Under Control Surface, choose:
DarkStage
Leave Input and Output set to None — the integration needs no MIDI port.
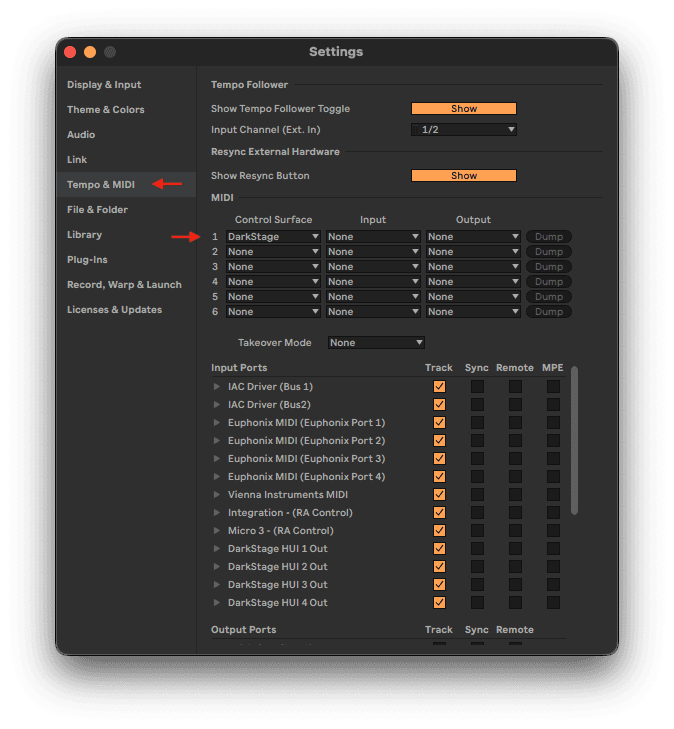
5. You're connected
DarkStage follows Live's counter and its Play, Stop and Record state immediately, with no need to move the playhead first.
6. Choose your counter format
Choose Bars + Beats or Min:Sec with the Ableton Counter control in DarkStage — the change applies instantly.
That control lives on the Counter widget: Wired Displays ▸ Counter ▸ Counter Format. Live doesn't tell DarkStage which counter its own display is showing, so you pick.
Ableton troubleshooting
- “DarkStage” missing from the Control Surface list: install the integration, then quit and restart Live — it's only scanned at startup.
- Counter not moving: confirm Ableton Live is the selected DAW, and that DarkStage is still chosen as a Control Surface in Live.
- Counter showing the wrong format: switch the Ableton Counter control in DarkStage between Bars + Beats and Min:Sec.
Need more help?
Email support@mydarkstage.com and we'll help you get set up.